Today i would like to share how to create amazing light effect in photoshop. In this tutorial we use fantastic method to make this effect. So, why not have a try..
STEP 1.
Create a new image with a size of around 1000x1000px, with a white background. It's wise to start out with a nice big work area to get the best results - we will reduce the size later. If you plan to apply this effect to a full word, you should increase the width of the image as necessary. Firstly, use the Color Picker to choose the color for your text (the example uses R:0 G:132 B:255, though you can choose another color if you prefer). Select the Type Tool, and type your text as big as you can so it fills as much of the canvas as possible.
STEP 2.
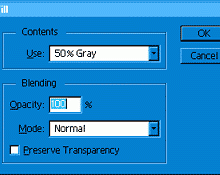
Now create a new Layer (Layer 1). Hold CTRL and click on the type layer you created in step 1 to create a selection of your text. With "Layer 1" selected on the layers palette, go to Edit » Fill and in the pop up use the settings shown in the image below.
STEP 3.
Do not lose the selection of the text. Switch to the channels palette, create a new channel and fill the selection with white. Go to Filter » Blur » Gaussian Blur and enter 14. Then again, Filter » Blur » Gaussian Blur and enter 7. And again Filter » Blur » Gaussian Blur and enter 4. Last time Filter » Blur » Gaussian Blur and enter 2. Deselect (CTRL+D) and go back to the layers palette.Now, hold CTRL and click on "Layer 1" and then go to Filter » Render » Lighting Effects.
Match These Settings

STEP 4.
Your text should now look similar to the example below. Now you need to blur this layer to get rid of the jaggies, so go to Filter » Blur » Gaussian Blur and enter 2 for radius.
STEP 5.
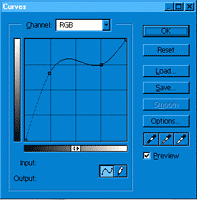
The next step is to make a curves adjustment. Go to Image » Adjust » Curves. Match the settings as close you can to the picture below. The closer you get the more realistic the effect will be.
STEP 6.
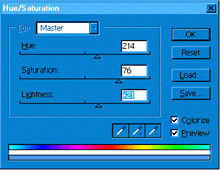
You should see the plastic effect coming along now, though some color adjustment is still needed. Go to Image » Adjust » Hue/Saturation. Match the settings to the example image below, and don't forget to check the "Colorize" box in the bottom right corner.
STEP 7.
Now for a few more color adjustments. Bring up the Color Balance tool by pressing CTRL+B, and make sure "Preserve Luminosity" is checked. Enter the following settings:Shadows: 0,0,-100
Midtones: 0,0, +93
Highlights: 0,0,-15
Click OK when finished, and it should look something like the sample below.

STEP 8.
All that remains is to add a drop shadow (Layer » Effects » Drop Shadow) and resize the image to the size you intend to use it at, (Image » Image Size). Of course you may want to keep a relatively large extra copy before you resize, so you can always go back and use a bigger version of your image if you decide to.
Thank you for visit our blog.
Hope you can learn something new from this tutorial. You can share your thought & suggestion with us though comments below.
Hope you can learn something new from this tutorial. You can share your thought & suggestion with us though comments below.
Discover the top most quality clipping path, clipping path service or low cost clipping path, image masking service & photo editing in reasonable price with quick turnaround time from Clipping Design, one of the most popular outsourcing clipping path service provider.
Clipping Design always ready to provide 100% handmade clipping path, photoshop clipping path, clipping path service, SEO service & photoshop masking with Guaranteed client satisfaction on top quality clipping path service & masking service .
Clipping Design always ready to provide 100% handmade clipping path, photoshop clipping path, clipping path service, SEO service & photoshop masking with Guaranteed client satisfaction on top quality clipping path service & masking service .
Thank you…
Reference: photoshopclub.webnode
.
No comments:
Post a Comment