Light Shaft Photoshop Tutorial
Step 1
Open an image into Photoshop. This Photoshop effect doesn’t work with every photo, so you’ll need to pick a good photo to start with. A photo that is compatible with this Photoshop tutorial is one with a visible sky and that is partially covered with trees, clouds, etc versus a clear blue sky. Below is an example of a good image for this effect.
Step 2
First, we’ll create a duplicate of the layer. Press Ctrl+J or go to Layer > Duplicate to create a duplicate layer. You should now have two layers in the layers palette.
Step 3
Make sure that you have the top layer selected. Choose Image > Adjustment > Threshold. The Threshold tool creates a 100% black and white image (no grays). We’ll use this tool to help us separate the sky and the foreground.In the Threshold tool, move the input slider all the way to the right. Then, move the input slider towards the left slowly until the sky appears. Once it appears, let go of the mouse button and click OK.

Step 4
What we’re creating is a mask that separates the sky from everything else. But chances are that it is not perfect. For example, in my image, the bride’s dress still shows up as white. To fix this, select the Brush tool and paint those areas black. The only thing that should be white is the sky.
Step 5
We’re done with creating the mask. We’ll now use this layer and blur it to create the light shaft. But first, we’ll need to make this layer blend into the layer below. Change the layer blending mode to Screen.
Step 6
This is where the results start to appear. Choose Filter > Blur > Radial Blur. The Radial Blur filter can create a zoom blur from any direction. In the Radial Blur filter, set the amount to 100%, blur method to zoom, and quality to best.Before we work on the blur center setting, we’ll need to know where the source of light is coming from. The easiest way is to look at the shadows. For example, looking at the shadows in the image below, we can tell that the light source, in this case the Sun, is from the top left.
Now that I know that the light source is on the top left, I will move the blur center in the Radial Blur filter setting to the top left.

You should now have a beautiful light shaft like the image below. It looks a little too short, so in the next steps, we’ll extend it.

Step 7
Extending the light shaft is easy. Just duplicate the layer and apply the same Radial Blur again. To do that, press Ctrl+J to duplicate the layer then Ctrl+F to repeat the previous filter. You should now have a longer light shaft.
Do this one more time (duplicate layer and repeat the Radial Blur filter). You can continue doing this, but usually the light shaft is long enough.

Here’s a timeline of the progress. Starting from the left is the image with no light shaft. Then to the left, the light shaft is created and lengthened.

Step 8
Now we have several layers and we’re going to merge all those light shaft layers into one. Select the top layer then press Ctrl+E to merge down. Do this again until you have only two layers: one with the light shaft and the background layer.
Step 9
We’re almost done! We just need to tweak the light so that it looks natural. Right now, the light shaft looks white and unless you’re working on a black & white image, it will look unnatural. To fix this, we’re going to tint the light shaft with the Hue/Saturation tool.Press Ctrl+U or choose Image > Adjustments > Hue/Saturation. In the Hue/Saturation window, checkmark the Colorize option. Then, adjust the hue and saturation so that the light shaft color matches the environment.

Step 10
Another step? Well, this is more like a half step because it is completely optional. Sometimes, you may notice that the light shaft will go past foreground objects. You can mask out the areas where it is visible by adding a layer mask.If you want to do this, add a layer mask by clicking on the new layer mask button in the layers palette or by choosing Layer > Layer Mask > Reveal All.

With the layer mask selected, choose the Eraser tool and erase the areas that you do not want the light shaft shining. I don’t quite like the results on my image and I prefer that the light shaft cover the father and daughter so I will simply disable the layer mask. To do this, hold the shift key and click on the layer mask thumbnail in the layers palette.

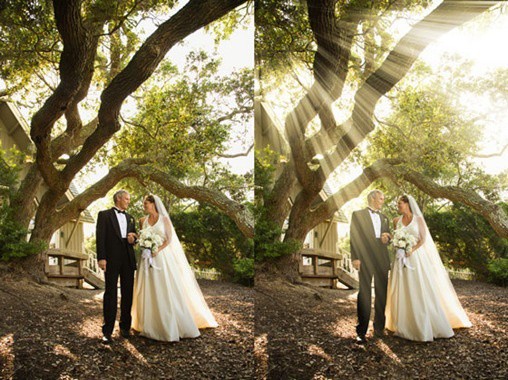
Final Results
Look how much drama is added to the photo. This effect can make good photos look great. How many wedding photos have you seen with a light shaft? Now you can add it to your photos easily with Photoshop.
Thank you for visit our blog.
Hope you can learn something new from this tutorial. For your valuable suggestion please put your comment below.
Hope you can learn something new from this tutorial. For your valuable suggestion please put your comment below.
Get brilliant qualities clipping path, clipping path service & image masking service from Clipping Design. Clipping Design always assures photo editing at quick turnaround time with guaranteed client satisfaction on top quality photoshop masking .
You can also discover 100% handmade clipping path & clipping path service in reasonable price.
You can also discover 100% handmade clipping path & clipping path service in reasonable price.
Thank you…
Reference: tutorialpulse
No comments:
Post a Comment