In this tutorial i will show you how to create a realistic meteor covered in fire . First we need to create a new Photoshop document with black background . Search on google for a nice texture for the meteor .
I used this picture :
 Now open the picture with Photoshop and with Elliptical Marque Tool select a round shape and paste it on the black background .Rename the layer with this shape to Meteor . Now your image should look like this:
 Next we have to make this shape to look like a sphere . For this go to Select--Load select then use Filter--Distort--Spherize with 100% then do do the Spherize filter again with 50%. Now the image look like a cracked planet.
We must make the meteor look realistic so we will add fire. I used this picture to add the flames :
 Open the picture with the flames , with rectangular marque tool select one flame and copy it. Create a new document , paste the flame and select just the fire ( go to Select-Color range , click on the black color then press Shift-Ctrl-I and copy the selected area).Paste the fire on your meteor document then from Edit-Transform-Rotate rotate it and from Edit-Transform-Scale make it bigger or smaller to fit with your meteor. Rename the layer to Fire1.
 The meteor doesn't look good just with one flame . Just repeat the step with the fire and add some more flames . I added 3 flames on separate payers and I obtained something like this:
 I attached here my layers :
 The flames doesn't look so good now but we can fix it . Put the Meteor layer above the fire layers and put the fire layers on Lighten Mode. The image will look like this:
 The image is almost ready. We must make the meteor to be covered in fire . Duplicate the meteor layer and name the copy of the meteor layer to Meteor2 . On Meteor2 put the layer mode to Hard Light and on Meteor put the layer mode to Overlay.The meteor is ready now :
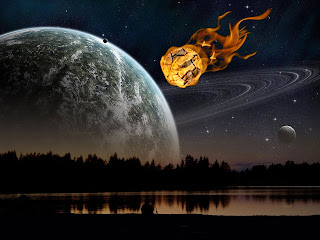
 For a more spectacular look , we can add this meteor on a nicer background . For this we need a background( search for a background on google ) and we need to put the meteor on it . Merge all the layers down , go to Select-Color Range and click on the black color . Then go to Select-Inverse(Shift-Ctrl-I) and copy(Ctrl+C) . Then open the background and just paste the meteor . The final result is amazing . I hope this tutorial will help you and if you have any questions just post here .
Thank you for visit our blog.
Hope you can learn something new from this tutorial. For your valuable suggestion please put your comment below.
Hope you can learn something new from this tutorial. For your valuable suggestion please put your comment below.
Get brilliant qualities clipping path, clipping path service & image masking service from Clipping Design. Clipping Design always assures photo editing at quick turnaround time with guaranteed client satisfaction on top quality photoshop masking .
You can also discover 100% handmade clipping path & clipping path service in reasonable price.
You can also discover 100% handmade clipping path & clipping path service in reasonable price.
Thank you…
Reference: easy-psd.blogspot
No comments:
Post a Comment