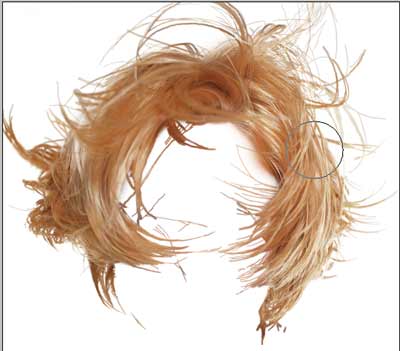

First download the pic of Lucille, we'll select her hair thanks to a mask.

Prepare it , get a soft brush,press Q, and start painting the hair.Use very small , soft brushes for thin hairs, and larger soft brushes for the dense hair mass.The quick mask result is

Then, we will mask the part opposite to the selection we just drew, for convenience: press Q, CTRL+SHIFT+N, and paint the selected area white

here's a mask.Save.
Now you have a poseable wig for further use.This part was not the goal of the job, but only a step in preparing the pic, though it is this lesson's subject: it allows you to alter each decisive part differently.Lets prepare the rest.
CTRL+click on the mask's layer, hide it, and press Q and CTRL+I
paint the body of Lucille, so you have her face and body masked.
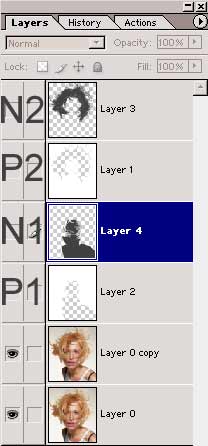
The goal is to create a mask of the background.Press Q, paint white.Now you have a mask for the hair, and one for the background, you want to have the negative masks handy for further selections.Select your background mask layer, create a new layer on top of it, CTRL+click your backgroung mask, press CTRL+SHIFT+I, and paint the selection black.Repeat the same operation with the hair mask: now you have two masks and their negatives.

Hide all the masks by ALT+clicking on the eye near the lucille layer: we want to isolate the skin (body/face): ctrl+click on the negative of the background (N1), and ctrl+shift+click on the negative of the hair to add its TM to the selection, now you should have selected the body+hair; press CTRL+SHIFT+I, create a new layer on top of the others, and paint white: now you have a mask for the background.
You now have masks for every decisive part of the picture, and you call transform their TM into a selection by CTRL+clicking on their layer.No need to save the selections through the select menu (exactly the same though as PShop creates new channels) , you have them visible and handy on layers.
REMEMBER THIS:
to recall a transparency map: CTRL+click on a layer
to add a mask's TM to selection: CTRL+SHIFT+click on its layer
to sunstract a mask's TM to selection: CTRL+ALT+click on its layer
to intersect with previous selection: CTRL+SHIFT+ALT+click on its layer.
Hope you can
learn something new from this tutorial.
Discover the
top most quality clipping
path, clipping
path service, photoshop clipping path
service or low cost clipping path, image
masking service
in reasonable price with quick turnaround time from Clipping Design, one of the most popular outsourcing clipping path service provider.
Clipping Design always ready to provide 100% handmade clipping path, photoshop clipping path, clipping path service, SEO service, image editing service & image clipping service with Guaranteed client satisfaction on top quality masking service
Clipping Design always ready to provide 100% handmade clipping path, photoshop clipping path, clipping path service, SEO service, image editing service & image clipping service with Guaranteed client satisfaction on top quality masking service
Thank you…
Reference: photoshopcontest
Hi, how nice your services. I am very interested that. More services you are provided to us and personal thanks for that. I like your services. I am happy for your image editing services and we are satisfied of our services. Nice site about photo editing and you are work professionally. For more about photo masking
ReplyDeleteVery nice article and I am working with some photographer they need to edit the photo by some clipping path company such as clipping crowd and clipping path india and there are lot of clipping path company basically in Bangladesh, However I've read the post and get somthing diffrent idea about Image Clipping Service, Clipping Path, Image Mask, Remove Image Background
ReplyDeletevery helpful & informative article. It's a good idea to say that you are a professional photoshop expert. Thanks for sharing
ReplyDeleteClipping Path Service
Background Removal Service
Image Masking ServiceNeck Joint Service
Photoshop Image Retouching Service
ReplyDeleteThanks sharing such beautiful information with us.
I hope you will share some more info about google cilpping path .
please keep sharing!
This is a very good suggest about Photoshop image masking, i have got very effective idea, thanks. you can visit my resources here http://www.clippingplace.com/background-removal-services/
ReplyDeleteIt is very helpful post about Clipping Path Services. Thanks for write this article.
ReplyDeleteThank you so much for this great resources about Photoshop image masking. you also check my image masking resources
ReplyDeleteThe 21st - century era was marked by a significant transition from traditional to electronic media. And, that is the place where the significance of the product image becomes extremely radiant. So, they get assistance from a clipping path company in the need of outsourcing for various instincts.
ReplyDeleteClipping Path service is provided to edit an image. In this service, you will be provided with the best quality image by removing unwanted things or photo background. Without any hard work, you will get a professional photograph.
ReplyDelete