 Today i would like to share hoe to make speedy car using photoshop. In this tutorial we use fantastic method to make this effect. So, why not have a try...
For this tutorial we need a picture with a car , but the background of the image must be white. Another think we need is a fire background picture.I found this background on google: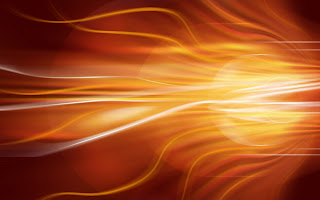 Now find the image with the car. Don't forget about the white Background . I decided to use this picture because I love BMW :)
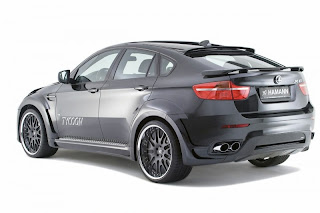 For
this tutorial we will use maybe an unusual thing. Open the image with
the car , select the whole layer (Ctrl+A) and go to Edit-Define Brush
Present and define the whole layer as a brush.
For
this tutorial we will use maybe an unusual thing. Open the image with
the car , select the whole layer (Ctrl+A) and go to Edit-Define Brush
Present and define the whole layer as a brush.
Now create a new document(Ctrl+N). Choose any size you want but I recommend
something like 800x800 or 1000x1000. Set the background color of the
new document to black. Now create a new layer on the black
document(Shift+Ctrl+N) , and from brushes select the earlier defined
brush and apply it with a white color. You should obtain something like
this: Now find the image with the car. Don't forget about the white Background . I decided to use this picture because I love BMW :)
 For
this tutorial we will use maybe an unusual thing. Open the image with
the car , select the whole layer (Ctrl+A) and go to Edit-Define Brush
Present and define the whole layer as a brush.
For
this tutorial we will use maybe an unusual thing. Open the image with
the car , select the whole layer (Ctrl+A) and go to Edit-Define Brush
Present and define the whole layer as a brush. Create
a new layer(Shift+Ctrl+N) and on this layer apply the fire background
(Open the fire background document , press Ctrl+A , Ctrl+C and on the
car document , on the new layer press Ctrl+V .Put the layer mod to
Overlay . You should obtain something like this:
Create
a new layer(Shift+Ctrl+N) and on this layer apply the fire background
(Open the fire background document , press Ctrl+A , Ctrl+C and on the
car document , on the new layer press Ctrl+V .Put the layer mod to
Overlay . You should obtain something like this:
 Now right click on the layer where you applied the brush and go to Blending Options and apply the following settings:
 For the Outer Glow the color is #ff0000.
For the Inner Glow the color is #ffa800.
 I
think that the image already look very nice but we can still improve
it.Go on the layer with the brush and duplicate it ( Layer-Duplicate
Layer). Now your layer pallet should look like this:
I
think that the image already look very nice but we can still improve
it.Go on the layer with the brush and duplicate it ( Layer-Duplicate
Layer). Now your layer pallet should look like this: Now
on the "Layer 2" we will add some filters. Go to Filter-Stylize-Wind
From the Left and add this filter.To repeat the filter , hit 2 or 3
times Ctrl+F. Another filter will be Filter-Blur-Motion Blur and apply
it with a 90 Angle and a Distance of 10 pixels.You should obtain
something like this:
Now
on the "Layer 2" we will add some filters. Go to Filter-Stylize-Wind
From the Left and add this filter.To repeat the filter , hit 2 or 3
times Ctrl+F. Another filter will be Filter-Blur-Motion Blur and apply
it with a 90 Angle and a Distance of 10 pixels.You should obtain
something like this:
Hope you can
learn something new from this tutorial.
Discover the
top most quality clipping
path, clipping
path service, photoshop clipping path
service or low cost clipping path, image
masking service
in reasonable price with quick turnaround time from Clipping Design, one of the most popular outsourcing clipping path service provider.
Clipping Design always ready to provide 100% handmade clipping path, photoshop clipping path, clipping path service, SEO service, image editing service & image clipping service with Guaranteed client satisfaction on top quality masking service
Clipping Design always ready to provide 100% handmade clipping path, photoshop clipping path, clipping path service, SEO service, image editing service & image clipping service with Guaranteed client satisfaction on top quality masking service
Thank you…
Reference:easy-psd
Cutout Image Media is a well-known graphics design and image editing service provider in Bangladesh. We have 11 years of working experience in the image editing industry. We are specialized in Photography post-production services for E-commerce and Product Photography.
ReplyDelete